Linux Con Workshop Demo
为了读者能更容易了解ServiceComb微服务框架的功能以及如何用其快速开发微服务,所以提供大家耳熟能详的例子,降低学习曲线的同时,增加趣味性,加深理解。
本文中假设我们成立了一家科研公司,处理复杂的数学运算,以及尖端生物科技研究,并为用户提供如下服务:
-
黄金分割数列计算
-
蜜蜂繁殖规律 (计算每只雄蜂/雌蜂的祖先数量)
但是我们如何将公司的这些强大运算能力提供给我们的消费者呢?
首先我们通过认证服务保障公司的计算资源没有被滥用, 同时我们对外提供Rest服务让用户来进行访问。 下面的视频展示具体的服务验证调用的情况。
业务场景
让我们先对业务场景进行总结分析
-
为了公司持续发展,我们需要对用户消费的运算能力收费,所以我们聘用了门卫认证用户,避免不法分子混入
-
为了提供足够的黄金分割数量运算能力,我们需要雇佣相应的技工
-
为了持续研究蜜蜂繁殖规律,公司建立了自己的蜂场,需要相应的养蜂人进行管理研究
-
为了平衡技工、养蜂人、和门卫的工作量和时间,我们建立了告示栏机制,让当前有闲暇的人员发布自己的联系方式,以便我们能及时联系技能匹配的人员以服务到来的用户
-
因为运算能力成本高昂,我们将运算项目进行了归档,以便未来有相同请求时,我们能直接查询项目归档,节省公司运算成本
-
面对上述复杂的场景,我们又聘用了部门经理来管理公司成员和设施
-
最后,当公司日益壮大,用户数量暴涨时,我们还需要招聘更多技工、养蜂人、和门卫,所以增加了人力资源部门
公司结构 (系统架构)
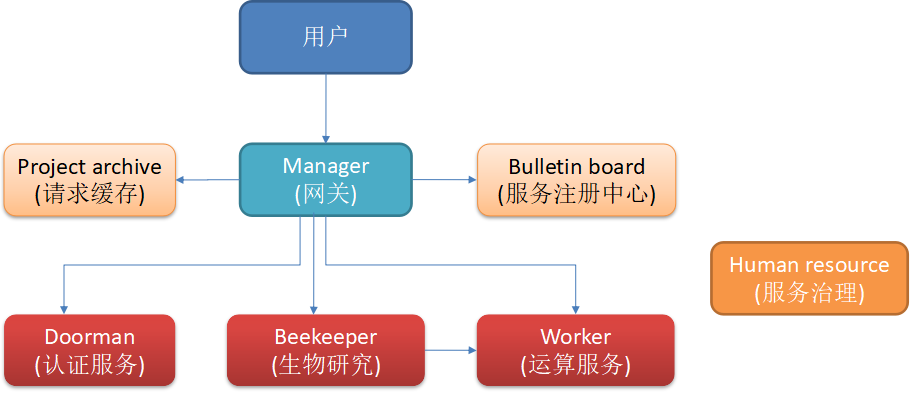
到现在业务场景已经比较清晰,我们把上述职务部门和设施画成公司组织结构图。

现在公司组织结构已经完整,让我们着手搭建相应部门。
技工 (Worker)
因为技工最为简单,对其他部门人员依赖最少,我们首先搭建这个部门。
黄金分割运算服务
技工的主要工作时提供黄金分割数列计算服务,当用户需要知道第n个黄金分割数时,技工以最快的速度计算出数值并返回给用户。 我们可以把这个工作简化为如下数学方程:
value = fibo(n)
在暂时不考虑性能的情况下,我们可以迅速实现黄金分割数列的计算。
interface FibonacciService {
  long term(int n);
}

@Service
class FibonacciServiceImpl implements FibonacciService {
  @Override
  public long term(int n) {
    if (n == 0) {
      return 0;
    } else if (n == 1) {
      return 1;
    }

    return term(n - 1) + term(n - 2);
  }
}
技工服务端点
黄金分割数量运算已经实现,现在我们需要将服务提供给用户,首先我们定义端点接口:
public interface FibonacciEndpoint {
  long term(int n);
}
引入 ServiceComb 依赖:
    <dependency>
      <groupId>org.apache.servicecomb</groupId>
      <artifactId>spring-boot-starter-provider</artifactId>
    </dependency>
接下来我们同时暴露黄金分割运算服务的Restful和RPC端点:
@RestSchema(schemaId = "fibonacciRestEndpoint")
@RequestMapping("/fibonacci")
@Controller
public class FibonacciRestEndpoint implements FibonacciEndpoint {

  private final FibonacciService fibonacciService;

  @Autowired
  FibonacciRestEndpoint(FibonacciService fibonacciService) {
    this.fibonacciService = fibonacciService;
  }

  @Override
  @RequestMapping(value = "/term", method = RequestMethod.GET)
  @ResponseBody
  public long term(int n) {
    return fibonacciService.term(n);
  }
}
@RpcSchema(schemaId = "fibonacciRpcEndpoint")
public class FibonacciRpcEndpoint implements FibonacciEndpoint {

  private final FibonacciService fibonacciService;

  @Autowired
  public FibonacciRpcEndpoint(FibonacciService fibonacciService) {
    this.fibonacciService = fibonacciService;
  }

  @Override
  public long term(int n) {
    return fibonacciService.term(n);
  }
}
这里用 @RestSchema 和 @RpcSchema 注释两个端点后,ServiceComb 会自动生成对应的服务端点契约,根据如下
microsevice.yaml 配置端点端口,并将契约和服务一起注册到Service Center:
# all interconnected microservices must belong to an application wth the same ID
APPLICATION_ID: company
service_description:
# name of the declaring microservice
  name: worker
  version: 0.0.1
# service center address
servicecomb:
  service:
    registry:
      address: http://sc.servicecomb.io:30100
  highway:
    address: 0.0.0.0:7070
  rest:
    address: 0.0.0.0:8080
最后,提供技工服务应用启动入口,并加上 @EnableServiceComb 注释启用 ServiceComb :
@SpringBootApplication
@EnableServiceComb
public class WorkerApplication {

  public static void main(String[] args) {
    SpringApplication.run(WorkerApplication.class, args);
  }
}
告示栏 (Bulletin Board)
告示栏提供为门卫、技工和养蜂人注册联系方式的设施,同时经理和养蜂人可通过此设施查询注册方的联系方式,以方便匹配能力的提供和消费。
Service Center 提供契约和服务注册、发现功能,而且校验服务提供方和消费方的契约是否匹配,我们可以下载编译好的版本直接运行。
养蜂人 (Beekeeper)
养蜂人研究蜜蜂繁殖规律,计算每只蜜蜂 (雄蜂/雌蜂) 的祖先数量。因为蜜蜂繁殖规律和黄金分割数列相关,所以养蜂人同时消费技工提供的计算服务。
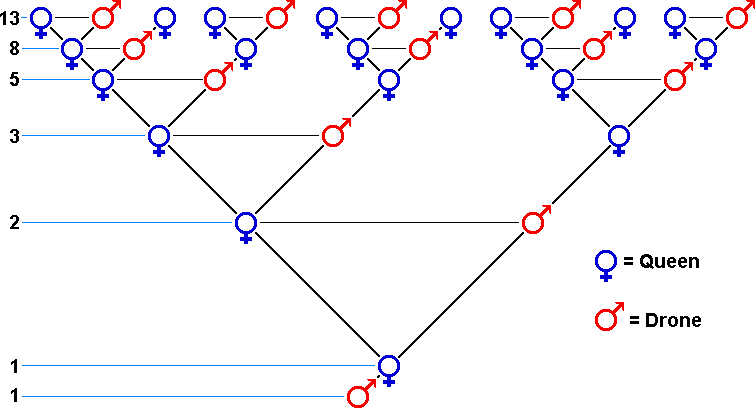
研究表明,雄蜂(Drone)由未受精卵孵化而生,只有母亲;而雌蜂(Queen)由受精卵孵化而生,既有母又有父。
 Credit: Dave Cushman’s website
参考上图,蜜蜂的某一代祖先数量符合黄金分割数列的模型,由此我们可以很快实现服务功能。
蜜蜂繁殖规律研究服务
首先我们定义黄金数列运算接口:
public interface FibonacciCalculator {

  long term(int n);
}
接下来定义并实现蜜蜂繁殖规律研究服务:
interface BeekeeperService {
  long ancestorsOfDroneAt(int generation);

  long ancestorsOfQueenAt(int generation);
}

class BeekeeperServiceImpl implements BeekeeperService {

  private final FibonacciCalculator fibonacciCalculator;

  BeekeeperServiceImpl(FibonacciCalculator fibonacciCalculator) {
    this.fibonacciCalculator = fibonacciCalculator;
  }

  @Override
  public long ancestorsOfDroneAt(int generation) {
    if (generation <= 0) {
      return 0;
    }
    return fibonacciCalculator.term(generation + 1);
  }

  @Override
  public long ancestorsOfQueenAt(int generation) {
    if (generation <= 0) {
      return 0;
    }
    return fibonacciCalculator.term(generation + 2);
  }
}
这里我们用到之前定义的 FibonacciCalculator 接口,并希望通过这个接口远程调用技工服务端点。@RpcReference
注释能帮助我们自动从Service Center中获取
microserviceName = "worker", schemaId = "fibonacciRpcEndpoint" , 即服务名为 worker 已经schema ID为
fibonacciRpcEndpoint的端点:
@Configuration
class BeekeeperConfig {

  @RpcReference(microserviceName = "worker", schemaId = "fibonacciRpcEndpoint")
  private FibonacciCalculator fibonacciCalculator;

  @Bean
  BeekeeperService beekeeperService() {
    return new BeekeeperServiceImpl(fibonacciCalculator);
  }
}
我们在技工一节已定义好对应的服务名和schema ID端点,通过上面的配置,ServiceComb 会自动将远程技工服务
实例和 FibonacciCalculator 绑定在一起。
养蜂人服务端点
与上一节技工服务相似,我们在这里也需要提供养蜂人服务端点,让用户可以进行调用:
@RestSchema(schemaId = "beekeeperRestEndpoint")
@RequestMapping("/rest")
@Controller
public class BeekeeperController {

  private static final Logger logger = LoggerFactory.getLogger(BeekeeperController.class);

  private final BeekeeperService beekeeperService;

  @Autowired
  BeekeeperController(BeekeeperService beekeeperService) {
    this.beekeeperService = beekeeperService;
  }

  @RequestMapping(value = "/drone/ancestors/{generation}", method = GET, produces = APPLICATION_JSON_UTF8_VALUE)
  @ResponseBody
  public Ancestor ancestorsOfDrone(@PathVariable int generation) {
    logger.info(
        "Received request to find the number of ancestors of drone at generation {}",
        generation);

    return new Ancestor(beekeeperService.ancestorsOfDroneAt(generation));
  }

  @RequestMapping(value = "/queen/ancestors/{generation}", method = GET, produces = APPLICATION_JSON_UTF8_VALUE)
  @ResponseBody
  public Ancestor ancestorsOfQueen(@PathVariable int generation) {
    logger.info(
        "Received request to find the number of ancestors of queen at generation {}",
        generation);

    return new Ancestor(beekeeperService.ancestorsOfQueenAt(generation));
  }
}

class Ancestor {
  private long ancestors;

  Ancestor() {
  }

  Ancestor(long ancestors) {
    this.ancestors = ancestors;
  }

  public long getAncestors() {
    return ancestors;
  }
}
因为养蜂人需要消费技工提供的服务,所以其 microservice.yaml 配置稍有不同:
# all interconnected microservices must belong to an application wth the same ID
APPLICATION_ID: company
service_description:
# name of the declaring microservice
  name: beekeeper
  version: 0.0.1
servicecomb:
  service:
    registry:
      address: http://sc.servicecomb.io:30100
  rest:
    address: 0.0.0.0:8090
  handler:
    chain:
      Consumer:
        default: bizkeeper-consumer,loadbalance
  references:
#  this one below must refer to the microservice name it communicates with
    worker:
      version-rule: 0.0.1
这里我们需要定义 servicecomb.references.worker.version-rule ,让配置名称中指向技工服务名 worker ,并匹配其版本号。
最后定义养蜂人服务应用入口:
@SpringBootApplication
@EnableServiceComb
public class BeekeeperApplication {

  public static void main(String[] args) {
    SpringApplication.run(BeekeeperApplication.class, args);
  }
}
门卫 (Doorman)
门卫为公司提供安全保障,屏蔽非合法用户,防止其骗取免费服务,甚至伤害技工和养蜂人。
门卫认证服务
认证功能我们采用JSON Web Token (JWT)的机制,具体实现超出了这篇文章的范围,
细节大家可以查看github上workshop的 doorman 模块代码。
认证服务的接口如下,authenticate 方法根据用户名和密码查询确认用户存在,并返回对应JWT token。用户登录后的每次
请求都需要带上返回的JWT token,而 validate 方法将验证token以确认其有效。
public interface AuthenticationService {
  String authenticate(String username, String password);

  String validate(String token);
}
门卫认证服务端点
与前两节的Rest服务端点相似,我们加上 @RestSchema 注释,以便 ServiceComb 自动配置端点、生成契约并注册服务。
@RestSchema(schemaId = "authenticationRestEndpoint")
@Controller
@RequestMapping("/rest")
public class AuthenticationController {

  private static final Logger logger = LoggerFactory.getLogger(AuthenticationController.class);

  static final String USERNAME = "username";
  static final String PASSWORD = "password";
  static final String TOKEN = "token";

  private final AuthenticationService authenticationService;

  @Autowired
  AuthenticationController(AuthenticationService authenticationService) {
    this.authenticationService = authenticationService;
  }

  @RequestMapping(value = "/login", method = POST, produces = TEXT_PLAIN_VALUE)
  public ResponseEntity<String> login(
      @RequestParam(USERNAME) String username,
      @RequestParam(PASSWORD) String password) {

    logger.info("Received login request from user {}", username);
    String token = authenticationService.authenticate(username, password);
    HttpHeaders headers = new HttpHeaders();
    headers.add(AUTHORIZATION, TOKEN_PREFIX + token);

    logger.info("Authenticated user {} successfully", username);
    return new ResponseEntity<>("Welcome, " + username, headers, OK);
  }

  @RequestMapping(value = "/validate", method = POST, consumes = APPLICATION_JSON_UTF8_VALUE, produces = TEXT_PLAIN_VALUE)
  @ResponseBody
  public String validate(@RequestBody Token token) {
    logger.info("Received validation request of token {}", token);
    return authenticationService.validate(token.getToken());
  }
}

class Token {
  private String token;

  Token() {
  }

  Token(String token) {
    this.token = token;
  }

  public String getToken() {
    return token;
  }

  @Override
  public String toString() {
    return "Token{" +
        "token='" + token + '\'' +
        '}';
  }
}
同样,我们需要提供服务应用启动入口以及 microservice.yaml:
@SpringBootApplication
@EnableServiceComb
public class DoormanApplication {

  public static void main(String[] args) {
    SpringApplication.run(DoormanApplication.class, args);
  }
}
# all interconnected microservices must belong to an application wth the same ID
APPLICATION_ID: company
service_description:
# name of the declaring microservice
  name: doorman
  version: 0.0.1
servicecomb:
  service:
    registry:
      address: http://sc.servicecomb.io:30100
  rest:
    address: 0.0.0.0:9090
经理 (Manager)
为了管理所有人员和设施,经理作为用户唯一接口人,主要功能有:
-
联系门卫认证用户,保护技工和养蜂人,以免非法用户骗取服务并逃避服务费用
-
联系能力相符的技工和养蜂人,平衡工作量,避免单个人员工作超载
-
管理项目归档,避免重复工作,保证公司收益最大化
由于经理责任重大,我们选取了业界有名的Netflix Zuul作为候选人并加以培训, 提升其能力,以保证其能胜任该职位。
首先我们引入依赖:
  <dependency>
    <groupId>org.apache.servicecomb</groupId>
    <artifactId>spring-boot-starter-discovery</artifactId>
  </dependency>
用户认证服务
当用户发送非登录请求时,我们首先需要验证用户合法,在如下服务中,我们通过告示栏获取门卫联系方式, 然后发送用户token给门卫进行认证。
ServiceComb 提供了相应 RestTemplate 实现查询Service Center
中的服务注册信息,只需在地址中以如下格式包含被调用的服务名
cse://doorman/path/to/rest/endpoint
ServiceComb 将自动查询对应服务并发送请求到地址中的服务端点。
@Service
public class AuthenticationService {

  private static final Logger logger = LoggerFactory.getLogger(AuthenticationService.class);
  private static final String DOORMAN_ADDRESS = "cse://doorman";

  private final RestTemplate restTemplate;

  AuthenticationService() {
    this.restTemplate = RestTemplateBuilder.create();

    this.restTemplate.setErrorHandler(new ResponseErrorHandler() {
      @Override
      public boolean hasError(ClientHttpResponse clientHttpResponse) throws IOException {
        return false;
      }

      @Override
      public void handleError(ClientHttpResponse clientHttpResponse) throws IOException {
      }
    });
  }

  @HystrixCommand(fallbackMethod = "timeout")
  public ResponseEntity<String> validate(String token) {
    logger.info("Validating token {}", token);
    ResponseEntity<String> responseEntity = restTemplate.postForEntity(
        DOORMAN_ADDRESS + "/rest/validate",
        validationRequest(token),
        String.class
    );

    if (!responseEntity.getStatusCode().is2xxSuccessful()) {
      logger.warn("No such user found with token {}", token);
    }
    logger.info("Validated request of token {} to be user {}", token, responseEntity.getBody());
    return responseEntity;
  }

  private ResponseEntity<String> timeout(String token) {
    logger.warn("Request to validate token {} timed out", token);
    return new ResponseEntity<>(REQUEST_TIMEOUT);
  }

  private HttpEntity<Token> validationRequest(String token) {
    HttpHeaders headers = new HttpHeaders();
    headers.setContentType(MediaType.APPLICATION_JSON_UTF8);

    return new HttpEntity<>(new Token(token), headers);
  }
}
请求过滤
接下来我们提供 ZuulFilter 实现过滤用户请求,调用 authenticationService.validate(token) 认证用户token。
若用户合法则路由用户请求到对应服务,否则返回 403 forbidden。
@Component
class AuthenticationAwareFilter extends ZuulFilter {

  private static final Logger logger = LoggerFactory.getLogger(AuthenticationAwareFilter.class);

  private static final String LOGIN_PATH = "/login";

  private final AuthenticationService authenticationService;
  private final PathExtractor pathExtractor;

  @Autowired
  AuthenticationAwareFilter(
      AuthenticationService authenticationService,
      PathExtractor pathExtractor) {

    this.authenticationService = authenticationService;
    this.pathExtractor = pathExtractor;
  }

  @Override
  public String filterType() {
    return "pre";
  }

  @Override
  public int filterOrder() {
    return 1;
  }

  @Override
  public boolean shouldFilter() {
    String path = pathExtractor.path(RequestContext.getCurrentContext());
    logger.info("Received request with query path: {}", path);
    return !path.endsWith(LOGIN_PATH);
  }

  @Override
  public Object run() {
    filter();
    return null;
  }

  private void filter() {
    RequestContext context = RequestContext.getCurrentContext();

    if (doesNotContainToken(context)) {
      logger.warn("No token found in request header");
      rejectRequest(context);
    } else {
      String token = token(context);
      ResponseEntity<String> responseEntity = authenticationService.validate(token);
      if (!responseEntity.getStatusCode().is2xxSuccessful()) {
        logger.warn("Unauthorized token {} and request rejected", token);
        rejectRequest(context);
      } else {
        logger.info("Token {} validated", token);
      }
    }
  }

  private void rejectRequest(RequestContext context) {
    context.setResponseStatusCode(SC_FORBIDDEN);
    context.setSendZuulResponse(false);
  }

  private boolean doesNotContainToken(RequestContext context) {
    return authorizationHeader(context) == null
        || !authorizationHeader(context).startsWith(TOKEN_PREFIX);
  }

  private String token(RequestContext context) {
    return authorizationHeader(context).replace(TOKEN_PREFIX, "");
  }

  private String authorizationHeader(RequestContext context) {
    return context.getRequest().getHeader(AUTHORIZATION);
  }
}
最后提供服务应用入口:
@SpringBootApplication
@EnableCircuitBreaker
@EnableZuulProxy
@EnableDiscoveryClient
@EnableServiceComb
public class ManagerApplication {

  public static void main(String[] args) {
    SpringApplication.run(ManagerApplication.class, args);
  }
}
application.yaml 中定义路由规则:
zuul:
  routes:
    doorman:
      serviceId: doorman
      sensitiveHeaders:
    worker:
      serviceId: worker
    beekeeper:
      serviceId: beekeeper

# disable netflix eurkea since it's not used for service discovery
ribbon:
  eureka:
    enabled: false
microservice.yaml 中定义服务中心地址:
APPLICATION_ID: company
service_description:
  name: manager
  version: 0.0.1
servicecomb:
  service:
    registry:
      address: http://sc.servicecomb.io:30100
项目归档 (Project Archive)
经理在每次用户请求后将项目进行归档,如果将来有内容相同的请求到达,经理可以就近获取结果,不必再购买 技工和养蜂人提供的计算服务,节省公司开支。
对于归档功能的实现,我们采用了Spring Cache Abstraction,具体细节超出了这篇文章的范围,大家如果有兴趣可以
查看github上workshop的 manager 模块代码。
人力资源 (Human Resource)
人力资源从运维层面保证服务的可靠性,主要功能有
-
弹性伸缩,以保证用户请求量超过技工或养蜂人处理能力后,招聘更多技工或养蜂人加入项目;当请求量回落后,裁剪技工或养蜂人以节省公司开支
-
健康检查,以保证技工或养蜂人告病时,能有替补接手任务
-
滚动升级,以保证项目需要新技能时,能替换、培训技工或养蜂人,不中断接收用户请求
人力资源的功能需要云平台提供支持,在后续的文章中会跟大家介绍,我们如何在华为云上轻松实现这些功能。
总结
在这篇文章中,我们用一个公司的组织结构作为例子,给大家介绍了微服务的完整架构,以及如何使用微服务框架 ServiceComb
快速开发微服务,以及服务间互通、契约认证。
Workshop demo项目也包含大量完整易懂的测试 代码,以及使用docker集成微服务,模拟生存环境,同时应用Travis搭建持续集成环境,体现 DevOps在微服务开发中的实践。希望能对大家有所帮助。
留下评论
您的电子邮箱地址并不会被展示。请填写标记为必须的字段。 *