基于 ServiceComb 和 SpringCloud Zuul 快速构建微服务系统
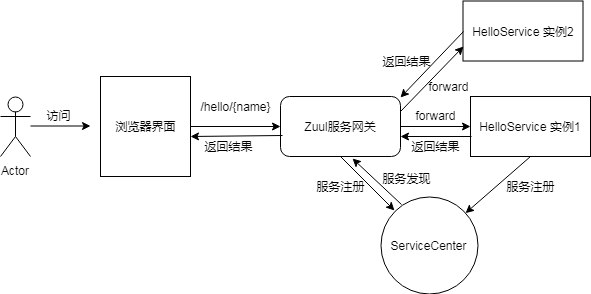
基于ServiceComb和Zuul实现微服务网关,如此一来用户只需要专注实现其业务需求。
场景
本文将以一个简单的Hello服务演示网关的使用。Hello微服务提供一个hello/{name}接口,只要传递路径参数name就可以返回打招呼内容。接口返回结果通过网关将在浏览器界面显示
技术准备
ServiceComb 作为后端微服务核心框架
ServiceCenter 作为服务发现与注册中心
SpringCloud Zuul 组件做服务网关
环境准备
以下环境为Windows 64位系统
ServiceCenter安装
下载地址:http://mirrors.hust.edu.cn/apache/servicecomb/servicecomb-service-center/1.1.0/apache-servicecomb-service-center-1.1.0-windows-amd64.tar.gz
下载后解压如下
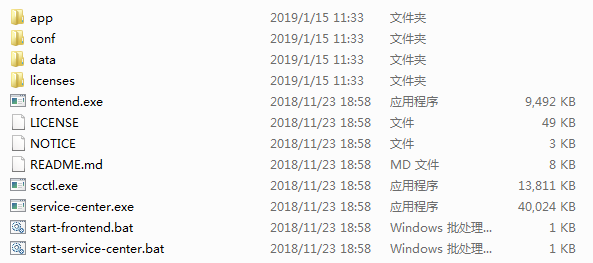
在该目录下双击service-center.exe即可启动,命令窗口中出现如下信息基本代表ServiceCenter启动成功,从这个信息也可以得知ServiceCenter监听的是30100端口,等下配置文件要用到。

问题点: 有可能会有如下信息,这个一般是端口被占用,很可能你打开了两个ServiceCenter,都关闭后再打开就可以了。

示例
一. 后端微服务 HelloService
1. 添加依赖
新建maven项目HelloService,pom文件如下
<?xml version="1.0" encoding="UTF-8"?>
<project xmlns="http://maven.apache.org/POM/4.0.0"
         xmlns:xsi="http://www.w3.org/2001/XMLSchema-instance"
         xsi:schemaLocation="http://maven.apache.org/POM/4.0.0 http://maven.apache.org/xsd/maven-4.0.0.xsd">
    <modelVersion>4.0.0</modelVersion>

    <groupId>com.servicecomb.example</groupId>
    <artifactId>HelloService</artifactId>
    <version>1.0-SNAPSHOT</version>

    <dependencies>
        <dependency>
            <groupId>org.springframework.boot</groupId>
            <artifactId>spring-boot-starter</artifactId>
            <version>1.5.12.RELEASE</version>
        </dependency>

        <dependency>
            <groupId>org.apache.servicecomb</groupId>
            <artifactId>spring-boot-starter-provider</artifactId>
            <version>1.1.0</version>
        </dependency>

        <dependency>
            <groupId>org.hibernate</groupId>
            <artifactId>hibernate-validator</artifactId>
            <version>5.3.6.Final</version>
        </dependency>

    </dependencies>

    <dependencyManagement>
        <dependencies>
            <dependency>
                <groupId>org.apache.servicecomb</groupId>
                <artifactId>java-chassis-dependencies</artifactId>
                <version>1.1.0</version>
                <type>pom</type>
                <scope>import</scope>
            </dependency>
        </dependencies>
    </dependencyManagement>

    <build>
        <plugins>
            <plugin>
                <groupId>org.springframework.boot</groupId>
                <artifactId>spring-boot-maven-plugin</artifactId>
            </plugin>
        </plugins>
    </build>

</project>
2. 配置
新建ServiceComb配置文件src/main/resources/microservice.yaml,内容如下
APPLICATION_ID: helloworld   # 应用名,注意与网关服务器的应用名保持一致
service_description:
  name: helloservice   # 微服务名
  version: 0.0.1       # 微服务版本号
servicecomb:
  service:
    registry:
      address: http://127.0.0.1:30100   # 服务注册中心(重要)
  rest:
    address: 0.0.0.0:7777    # 微服务启动端口
3. 项目入口
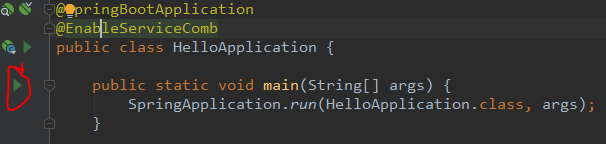
新建启动类HelloApplication.java,内容如下
package com.servicecomb.example;

import org.apache.servicecomb.springboot.starter.provider.EnableServiceComb;
import org.springframework.boot.SpringApplication;
import org.springframework.boot.autoconfigure.SpringBootApplication;


@SpringBootApplication
//这个注解使Spring能够自动配置ServiceComb模块
@EnableServiceComb
public class HelloApplication {
    public static void main(String[] args) {
        SpringApplication.run(HelloApplication.class, args);
    }
}
新建Controller类HelloController.java (这里我习惯SpringMvc的叫法,重点看注解)
package com.servicecomb.example;

import org.apache.servicecomb.provider.rest.common.RestSchema;
import org.springframework.web.bind.annotation.GetMapping;
import org.springframework.web.bind.annotation.PathVariable;
import org.springframework.web.bind.annotation.RequestMapping;

//restful服务契约
@RestSchema(schemaId = "helloController")
@RequestMapping(path = "/")
public class HelloController {

    @GetMapping(path = "/hello/{name}")
    public String hello(@PathVariable("name") String name) {
        return "Hello, " + name;
    }

}
4. 启动
到此,一个微服务就写完了,如下在IDEA里面直接启动应用
二. 编写Zuul网关服务
1. 添加依赖
新建maven项目 zuulserver,pom文件如下
<?xml version="1.0" encoding="UTF-8"?>
<project xmlns="http://maven.apache.org/POM/4.0.0"
         xmlns:xsi="http://www.w3.org/2001/XMLSchema-instance"
         xsi:schemaLocation="http://maven.apache.org/POM/4.0.0 http://maven.apache.org/xsd/maven-4.0.0.xsd">
    <modelVersion>4.0.0</modelVersion>

    <groupId>com.servicecomb.example</groupId>
    <artifactId>zuulserver</artifactId>
    <version>1.0-SNAPSHOT</version>

    <dependencies>
        <dependency>
            <groupId>org.springframework.boot</groupId>
            <artifactId>spring-boot-starter</artifactId>
            <version>1.5.12.RELEASE</version>
        </dependency>

        <!-- ServiceComb框架,提供基础能力 -->
        <dependency>
            <groupId>org.apache.servicecomb</groupId>
            <artifactId>spring-boot-starter-servicecomb</artifactId>
            <version>1.1.0</version>
        </dependency>

        <!-- ServiceComb与SpringCloud Zuul的集成框架 -->
        <dependency>
            <groupId>org.apache.servicecomb</groupId>
            <artifactId>spring-boot-starter-discovery</artifactId>
            <version>1.1.0</version>
        </dependency>

        <!-- SpringCloud Zuul框架 -->
        <dependency>
            <groupId>org.apache.servicecomb</groupId>
            <artifactId>spring-cloud-zuul</artifactId>
            <version>1.1.0</version>
        </dependency>

    </dependencies>

    <!-- 导入ServiceComb所需依赖 -->
    <dependencyManagement>
        <dependencies>
            <dependency>
                <groupId>org.apache.servicecomb</groupId>
                <artifactId>java-chassis-dependencies</artifactId>
                <version>1.1.0</version>
                <type>pom</type>
                <scope>import</scope>
            </dependency>
        </dependencies>
    </dependencyManagement>

    <build>
        <plugins>
            <plugin>
                <groupId>org.springframework.boot</groupId>
                <artifactId>spring-boot-maven-plugin</artifactId>
            </plugin>
        </plugins>
    </build>

</project>
2. 配置文件
新建springboot配置文件src/main/resources/application.yaml,内容如下
zuul:
  routes:         # 定义路由转发规则。凡是匹配/helloservice/**的路由都会转发到helloservice服务
    helloservice: /helloservice/**
server:
  port: 8080     #SpringBoot框架的配置,服务启动端口
新建ServiceComb配置文件src/main/resources/microservice.yaml,内容如下
APPLICATION_ID: helloworld   # 应用ID
service_description:
  name: gateway     #  微服务名
  version: 0.0.1    #  微服务版本
servicecomb:
  service:
    registry:
      address: http://127.0.0.1:30100   # 服务注册中心地址 (重要)
3.项目入口
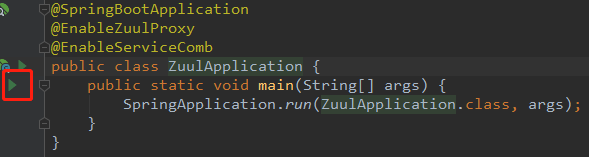
新建启动类 ZuulApplication.java
package com.servicecomb.example;

import org.apache.servicecomb.springboot.starter.provider.EnableServiceComb;
import org.springframework.boot.SpringApplication;
import org.springframework.boot.autoconfigure.SpringBootApplication;
import org.springframework.cloud.netflix.zuul.EnableZuulProxy;

@SpringBootApplication
@EnableZuulProxy
@EnableServiceComb
public class ZuulApplication {
    public static void main(String[] args) {
        SpringApplication.run(ZuulApplication.class, args);
    }
}
新建静态文件 src/main/resources/static/index.html,内容如下 (static目录是按springboot项目规范,属于应用静态文件根目录)
<!DOCTYPE HTML>
<html>
<head>
    <meta charset="utf-8">
    <link rel="stylesheet" href="https://cdn.bootcss.com/bootstrap/4.0.0/css/bootstrap.min.css" integrity="sha384-Gn5384xqQ1aoWXA+058RXPxPg6fy4IWvTNh0E263XmFcJlSAwiGgFAW/dAiS6JXm" crossorigin="anonymous">
    <script src="https://code.jquery.com/jquery-3.2.1.min.js" crossorigin="anonymous"></script>

</head>
<body>

<div style="width:300px; margin:0 auto ; margin-top: 50px;">

<div class="input-group mb-3">
    <input id="username" type="text" class="form-control" placeholder="Username" aria-label="Username" aria-describedby="basic-addon1">
    <div class="input-group-prepend">
        <button style="" type="button" class="btn btn-primary" onclick="testCall()">打招呼</button>
    </div>
</div>
<div >
    <div style="height: 200px;" class="form-control"  id="resultDiv" >
    </div>
</div>

</div>

</body>
<script>
    function testCall() {

        var username = $("#username").val();

        if(!username){
            return
        }

        $.ajax({
            url: "/helloservice/hello/"+username,
            success: function (data) {
                var resultDiv = document.getElementById("resultDiv");
                console.log(data)
                resultDiv.innerText = data;
            },
            error: function (data) {
                var resultDiv = document.getElementById("resultDiv");
                console.log(data)
                resultDiv.innerText = JSON.stringify(data);
            }
        })
    }
</script>
</html>
4. 启动
到此,网关服务器写完,如下在IDEA里面直接启动应用
三. 演示效果
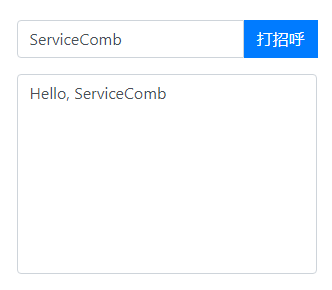
浏览器访问http://localhost:8080/ ,如下图。 在输入框中输入姓名,就可以在下面看到打招呼的信息
总结
从以上的示例可以看出,通过 ServiceComb 结合SpringCloud Zuul 实现服务网关功能只需一些简单的配置。后续可以在网关服务上实现统一的鉴权,日志记录,和自定义过滤器等。
参考
- [1] SpringCloud Zuul
- [2] ServiceComb
留下评论
您的电子邮箱地址并不会被展示。请填写标记为必须的字段。 *